Showing posts with label cricut. Show all posts

Wednesday, October 19, 2011

apple towels

I found some towels on clearance at Target oh, about 9 months ago! Two for only $1.50. I've been wanting to sew something on them, but couldn't figure out what. I decided I'd do something for my mom's birthday. She has her kitchen in red and green apples.

I pulled out my Cricut and used the Plantin Schoolbook cartridge (I never use those anymore!) and cut out an apple on cardstock. I then took squares of fabric and adhered heat n bond to the backs, traced the apple and cut it out.


I had one heck of a time getting the back of the heat n bond off so it could adhere to the towels, but I did it. And then I sewed them to it. My mom absolutely loved them. And, bonus, the green fabric matches the cushions on her kitchen chairs exactly :)


I had also seen a cool decoration on pinterest using Mason jars. While we were at Brandon's grandma's, I noticed she had a bunch and she told me to go ahead and take as many as I wanted. Score! So, I made one up for my mom. I didn't put any epsom salt in the bottom since it was only August and I thought she might want to do something else with it before Christmas.


I made a few up for myself. One of the parties we threw, I cut a bunch of wild flowers from our yard and put in them. Right now, I have small decorative pumpkins and gourds filling one for fall. I'll try and take a picture :)


Wednesday, October 12, 2011

friends

Awhile back, I made a quick, easy frame over Labor Day weekend to showcase one of my favorite pics of my friends and I. Well, it went over pretty well, so I made another one for my friend for her birthday.


I used the same black spray paint, just changed it up a bit. We're Ohioans and most everyone here is REALLY into the Buckeyes (including this friend), so I figured some leftover Buckeye paper would be perfect. Now, if only we had a recent pic of us in our OSU garb, that would've made it even more perfect! But, I found a good one from NYE.


I had some black fabric with white and gray polka dots on it and made 2 rosettes to help make it a little girly and add interest in the top corner.


I think it turned out great..now we just have to take pictures at our next buckeye gtg!

Sunday, October 9, 2011

Pinterest Craft

Are you on Pinterest? I am....I'm in LOVE. I resisted for awhile because I knew it would be a total time killer! But, in the long run, it saves me time because I'm not emailing myself pictures to keep! Quite a few of my friends are on there, too and so when I needed a housewarming gift for one of them, I started with her Pinterest site! :)

She had this cute little plate that I thought would be super simple...Here's a version that I had pinned from Little Birdie Secrets:


Instead of the Menu, her's said "Notes" at the top. So, since she pinned, it, I followed suit! I found a square plate at Wal Mart, got out my cricut and black vinyl and in a matter of 10 minutes, I was done! I like easy crafts like that!


On the back, I used a circle of velcro to attach a dry erase marker. I wanted to make it so it was hidden, but easily accessible.


Friday, September 2, 2011

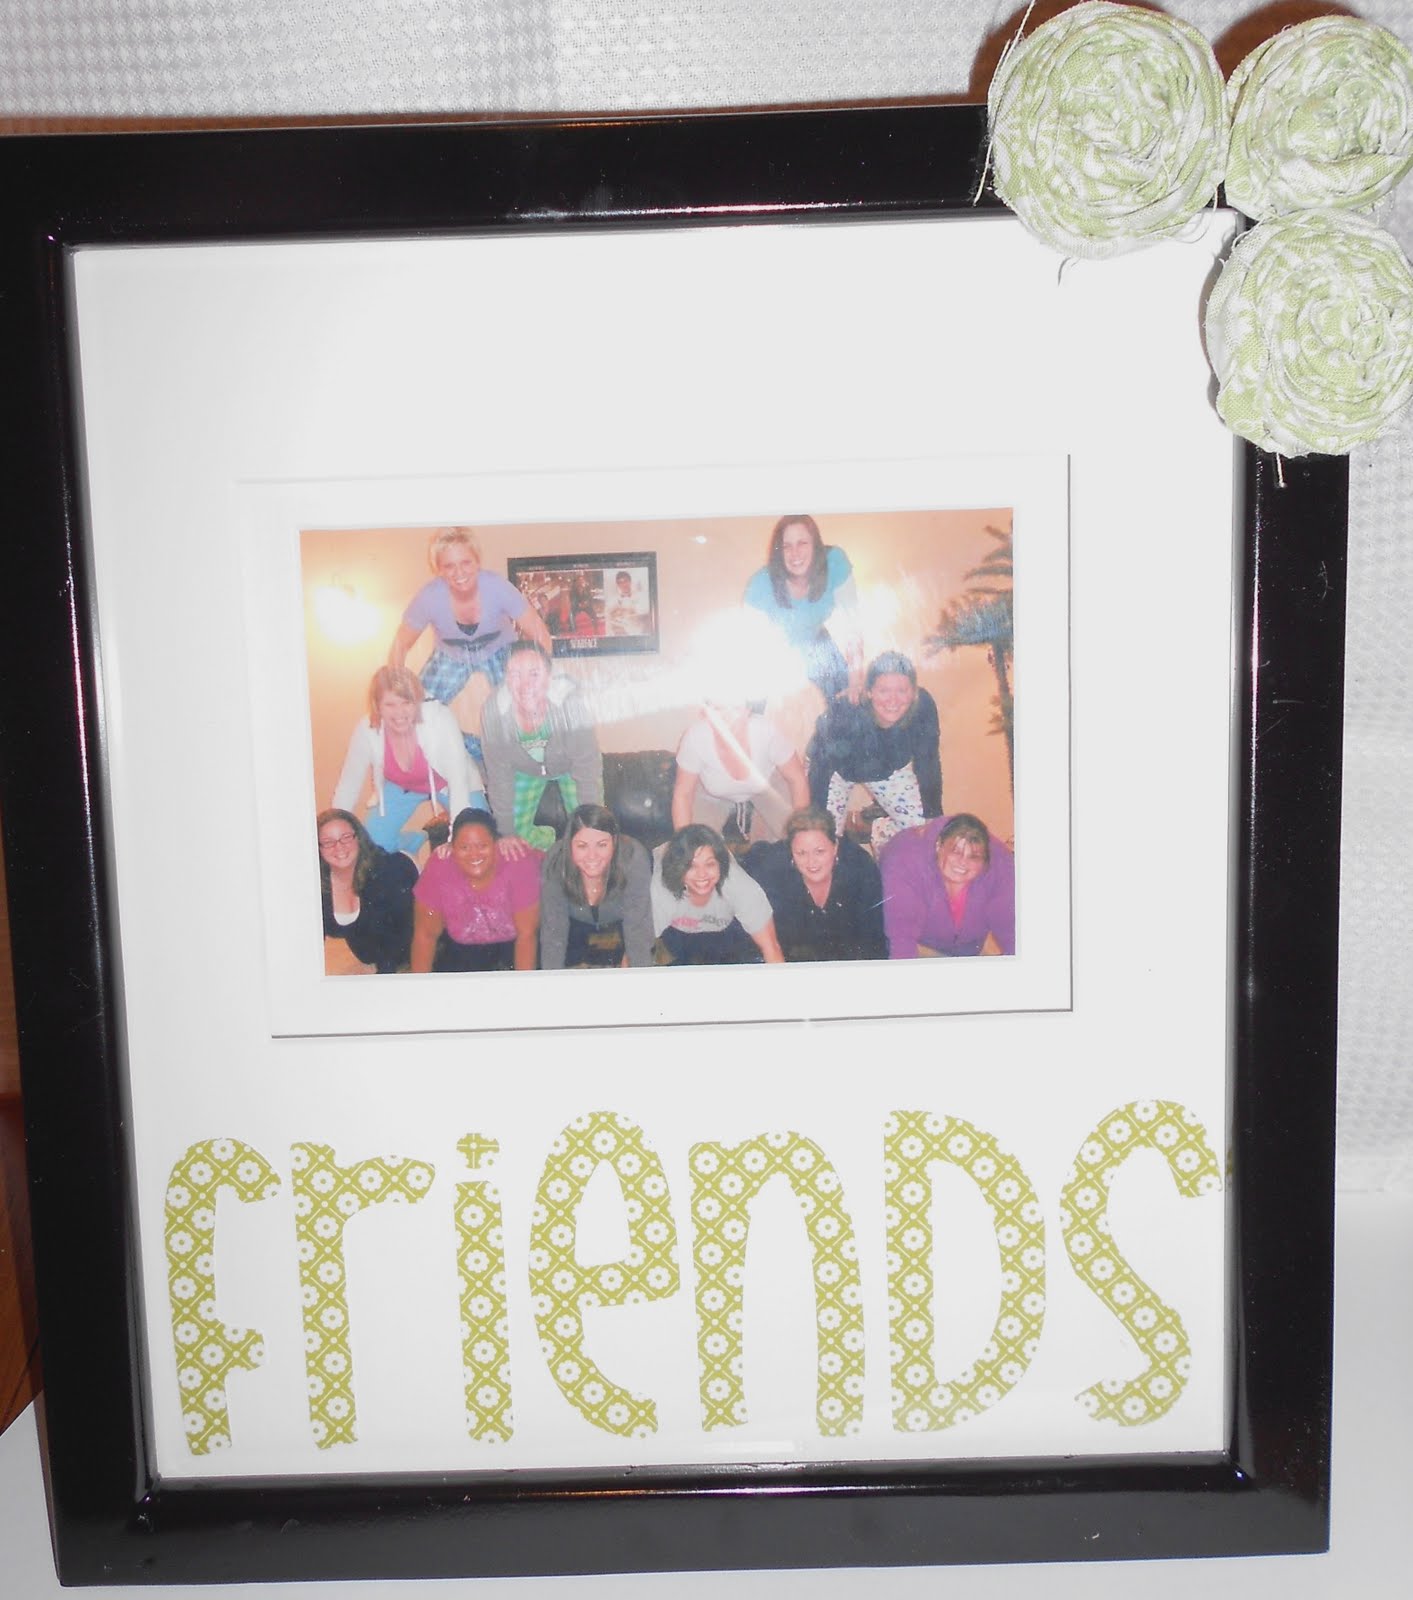
friends

I had to print a picture out for Lexi. She needed a family picture to take for preschool. Yes. Preschool. I can't believe it! Anyway, while I printed out one of the three of us, I decided I needed to update a few pics I have in frames. I did one of my friends and I on our girls trip to update another one I had of all of us about 2 or 3 years ago. However, after printing and going to put it in the frame, I realized it was a 4x6 and my frame was a 5x7! So, you know, instead of making myself a mat, I had to just make a whole new frame!


This started out as an ugly light brown frame. I sprayed it black to go with all the rest of the black frames in my house. It's a fabulous frame as it comes with a 4x6 mat that has two layers on it! I knew I wanted to do something with the mat...I couldn't leave it alone :) So I pulled up my SCAL, and cut out friends in my wish i were taller font, which is one of my faves! The paper is Jillibean Soup, Blossom Soup.


Then, I thought it needed something else....so I pulled out some green and white fabric that went with the Blossom Soup and made some fabric flowers to put on top. Love how it turned out! A simple project made with everything I had on hand :)


And, yes...my friends and I have a thing about pyramids....whenever we're together in a group, it seems we have to do one :)

Monday, January 10, 2011

yay!

One of my friends is off on a cruise ship to get married today! I wish I could be with her to share in her special day, but, unfortunately, it's an incredibly busy time at work and there was no way I could go. She had asked me to make her a sign/flag that she could use in her pictures. I didn't really have any requirements besides it needed to have the word "yay" on it.

So here's what I came up with for her.....


I used poster board as my base. I cut two triangles and covered both in the hot pink fabric (her colors are hot pink, orange, and green). Each side got orange rick-rack ribbon around the edges. I then made a little pocket with some leftover fabric which allows the stick (wrapped in orange ribbon) to slide in and out. That way, she can pack it easily in her suitcase.

I used my cricut to cut out the yay! in vinyl. It was easy to put on and she can remove it if she just wants it for decoration.


Em, I know you'll be a stunning bride! I can't wait to see all the pictures and celebrate when you get home! Congratulations and here's to many many happy years!

Tuesday, April 13, 2010

birthday wishes

I have 3 birthdays this week, so I had to get busy making cards! Today's card is something I keep seeing pop up over different blogs. I think the original card came from Betsy Veldman (or at least that's where I saw it first).

Love, love love the kraft on kraft look! I used Walk in My Garden to cut out a few different sizes of daisies since I don't have a die cutting machine (although, with PTI selling all these fabulous dies, that might be next on my wish list!). Added a few colorful buttons, stamped a sentiment and I was done!

I won't tell you how long it took me to get my Cricut to cut right, though! Or to figure out how to actually use a cartridge! Since I bought SCAL, I don't think I've touched a cartridge!


Supplies (all PTI unless noted):
Paper - Kraft
Ink - Scarlet Jewel
Stamps - Mega Mixed Messages
Other - Cricut Walk in My Garden, Vintage Buttons: Spring Moss, Lemon Tart, Scarlet Jewel, Plum Pudding

Monday, March 8, 2010

Lucky

I broke out my sewing machine for it's actual intended purpose over the weekend...sewing fabric! I'm not, nor have I ever been, a sewer. I'm lucky to sew a straight line. However, while on vacation and searching blogs, I found this fun pillow that inspired me. I figured something like it would be easy enough to complete.

So, while at IKEA, I picked up a plain white pillow (20x20) for $3.99. I had some plain muslin fabric at home in my stash and I picked up a square of a green fabric quarter at JoAnns for $1.99.


I don't do well with measuring either, so I had a bunch left at the top. I decided rather than to sew it, I'd just do some Ripe Avocado buttons with Ecru embroidery floss to close it.


The font I used is called A Yummy Apology (how fun is that name?) and I cut the fabric using my Cricut and SCAL. Ironed it on using Heat Bond and that's it! Now I have a fun pillow for St Patty's Day that only cost me $5.98 and a little bit of time!


Tuesday, February 9, 2010

Oh Happy Day!


Let me tell you how happy this card makes me. Not because I love it (because I do, but that's not it)...because I found a FREE svg file for the SCAL that works with PTI's Vintage Labels!!!! WHOO HOO!

I don't own a die cut machine or a punch that'll do any of the labels in this set, so every time I stamp it, I have to hand cut it out and that's a pain in a half. So, since I had some time, I did a search for free svg files to just see what I could find.

This came from http://freesvgs.blogspot.com/ and I found a few others while I was there that I liked and downloaded. Super easy to use....just click on the picture you want, it'll open up and you right click and save and pull it up in SCAL and resize it to your liking. For the Dark Chocolate, it's sized at 2.25" (make sure you check the keep proportions box!) and the Ripe Avocado is sized at 2".


So anyway, I also needed a bit of inspiration, so I headed over to Taylor's blog and found one of her older challenges. It's always fun trying to come up with something based on those! I feel like I need something inside the label, but I don't know what? For now, it'll stay blank!


Supplies (all PTI unless noted):
Paper - Kraft, Dark Chocolate, Ripe Avocado, Turning a New Leaf
Stamps - Vintage Labels, Everyday Button Bits
Ink - Ripe Avocado, Dark Chocolate
Other - SCAL, Vintage Buttons: Dark Chocolate, Ripe Avocado, Wood

Wednesday, January 6, 2010

Cutesy Cover

Just recently, Lauren Meader (you know, the girl who was doing PTI's Timeless Templates that I LOVE), opened up her own brand spanking new shop. Of course, she had to do fun new templates! She offers one on her blog for FREE called Cutesy Cover and not only can you get it for free, but you can get it in an svg format!! Whoo hoo! No more cutting!

So I sat down Sunday night for a quick crafting session and downloaded the template and everything with it. Plopped it in the SCAL and cut it out and had it put together in no time!

I used Spring Moss cardstock and then cut the template for the paper pieces out of Turning A New Leaf. I haven't decided completely on the closure, so it doesn't look the best right now.


The best part about this is that you don't have to use much tape on it. I used the bottom just like a regular box and tucked it in. Now, if you want to put a few heavier things in there, I'd probably tape it, but right now I'm not worried about it! AND...I got to put to use the Scor Tape B got me for Christmas. I'm in heaven!!!! Love that there's nothing that sticks to me and my clothes because of static cling and love that I can just rip the tape..no scissors necessary! Woop!


Supplies (all PTI unless noted):
Paper - Spring Moss, Turning A New Leaf
Other - SCAL, Spring Moss Twill Ribbon, Cutesy Cover from My Time Made Easy

Monday, December 14, 2009

Christmas Packaging

I have a bunch of plain brown paper bags in my stash and I decided I wanted to use them for a few gifts I needed this weekend. I wasn't sure what I wanted to do, but I knew my Cricut would come in use!
I wound up cutting out an S and then using the negative (I think that's the correct term!), I sized it down, used my corner rounder and added a piece of PTI Holiday Cheer to the back. Quick and easy way to make a great package! You can also see my tags I made earlier :)


Wednesday, October 21, 2009

Creating with vinyl

I had my first experience using vinyl and my Cricut last week. Let me tell you, I was nervous! See, I've had ideas in my head for awhile of what I wanted to do for my sister's wedding. Of course, if you know me, I'm a procrastinator. I finally ordered the vinyl the week before the wedding. Thursday night, I was out trying to find something to put it on. And Friday I was finishing it up. But...I think it came out fabulously!!

For my vinyl, I used ebay seller, AdaboyArts. Awesome seller, btw! I had recently purchased Sure Cuts A Lot to use in conjunction with my cricut. This means that I don't have to purchase a ton of cartridges just so I can get different fonts. It works with all the fonts that I have on my computer already! (it will also do anything else, but I obviously only needed it for the fonts)

I was originally just looking for a plain board that I would paint and apply the vinyl lettering to. However, in my quest to find the perfect one, I found this awesome metal board with the scroll work already on it! They had two sizes (available at my Hobby Lobby) and I got the larger size. The best part was that I had a 40% off coupon, so it made it even cheaper! Score! :)

Thanks to Jan, I knew what all I needed to do apply the vinyl easily. She made an outstanding, easy to follow tutorial. Within no time, everything was done! (ok, I shouldn't say that...it took me a bit because I had to get everything to line up perfectly!)


I really liked how it turned out! And, I only needed a 12x12 piece of vinyl to cut this out. For reference, the letters are 5.0 inches tall and 2.5 inches wide.


Friday, August 28, 2009

Preschool bag

Our neighbors daughter is getting ready to go to preschool for the first time. Over the summer, they were given plain little tote bags and told to decorate them however they want and to have their name on it. Shelby's Momma isn't very creative or crafty so she came knocking on my door. Here's what we came up with using fabric and my cricut.


Shelby picked out everything, we just helped her speed along the process some :) She's a total girly-girl, so she wanted pink and butterflies and flowers. The above picture is the front of the bag. I love how the flowers turned out. I wound up doing a 2in and a 2.25in and blacked it out and then cut out the centers so there's actually 3 layers there.

Here's the back of the bag. Originally, it was supposed to have the same thing front and back, but my blade was on its last leg and I said no :)


Flower closeup. The green has butterflies and the red/pink has triangles. I had her buy the small squares of fabric that JoAnns has.


The butterfly has little spirals. I think he's cute :)


Sunday, July 19, 2009

Momma Candi

My friend, Candi, is about ready to have a little boy. I can't wait!! She already has a 7 year old, but this will be her husband Chris's first. They are both so excited and I know they're going to be awesome parents once again!


I FINALLY got to use my Cricut!!! Yay!!! I was trying to figure out what I could do with the packaging (I got her what every parent REALLY wants...diapers and wipes!) and decided to use Kraft paper and cut stars and "a star is born!" out of blue paper. I just glued it all on using my Stampin' Up! glue marker.


I love this stamp....if you click on the picture to enlarge it, you might see it better. But, the words are the lyrics to twinkle twinkle little star :)


Sunday, March 15, 2009

Did I hear that right?

B is off visiting his grandma this weekend and trying to clean out his dad's garage (not a small task, let me tell you! I believe I've commented about the no less than 10 shovels in one garage...). We've talked to him several times since Friday night. Yesterday at one time I talked to him, he had been visiting with his friend/brother, Mike. He and his wife, Amanda, just moved into a new to them house so Mike was showing off the house including Amanda's scrap room.

While on the phone, B says, "Amanda has this scrapping thing that I want to buy for you." Oh really? Hmm. "It's called a cricut." (I've kept my obsession a secret from him apparently...) "It's really cool." So I say, oh yeah, I really really want one and he comments that it's only $159. Well, if you know me, you know I can't get the littlest, smallest one and I need the big mamma-jamma. Told him as much.

L: "That's not the one I want....I want the bigger one...the one that's like $299."
B: "Go figure"
L: "No, I want the bigger one cause it will do vinyl."
B: "Oh really? Huh. Well, we may need to split that cause I could use the vinyl, too, for car stuff."

I thought I had cleaned out my ears yesterday morning, but I'm not so sure.....